Magnetic Combined Lab
last updated July 29, 2003

home | notes menu

(Explanatory Note:  Your instructor, Mike Nassir, and the two previous head TAs of the 152/272 labs, Andrew and I, got together to determine what lab should be dropped to accomidate the shortness of the summer session.  We decided to keep all of them but with the following changes. In this laboratory exercise, we have combined two labs from your manual, Chapter 8 and Chapter 9.  Most students in taking this course are in 152L, and therefore do not cover the Biot-Savart law upon which part 2 of Chapter 8 is based.  This part is now omitted.  In addition, our new Gaussmeters don't have enough precision to measure the magnetic field of the Earth, and so this part is also omitted.  What is left is the lab below.  If you are interested in the original lab notes, then you may find them at http://www2.hawaii.edu/~jmcfatri/labs/magfieldmap.html and at http://www2.hawaii.edu/~jmcfatri/labs/magdefl.html)

P re-lab:
The pre-lab and the instructions for the pre-lab are located at http://www2.hawaii.edu/~jmcfatri/labs/magcomboprelab.html .

Objectives
The goals of this lab are to:

1) map the magnetic field of a bar magnet and a solenoid
2) observe the effect of a magnetic field on a moving charge
3) verify the "right hand rule" which governs the direction of the force on the charge
4) calculate the charge to mass ratio (q/m) of an electron

N otes on Chapter 8 and 9
pp 47 - 66 of your lab book
Magnetic Fields:

Hopefully you have learned in your lecture that the source of the magnetic field is a moving charge.  If I have a current in a wire, it will produce a magnetic field, since a current is made by moving charges. 

  • Direction of the magnetic field
Theory: The direction of the magnetic field is given by the right hand rule

Measurement: The direction of the magnetic field can be measured using a compass.  The compass points in the direction of the magnetic field.  It does this because a compass is a magnet, and magnets feel a torque (rotating force) when it is placed in a magnetic field.

  • Strength of the magnetic field
Theory: To get the strength of the magnetic field of a collection of moving charges (currents), you must use one of the two laws available to you: The Biot-Savart Law or Ampere's Law.  In 152, these equations are already solved to give you the magnetic field strength of certain current configurations, which are listed in your book.

Measurement: To measure the magnetic field strength, you can use a gaussmeter.  A gaussmeter is a device which uses the Hall effect to give you a value of the magnetic field.  (Consult your text for a full explanation of the Hall effect)

In this lab, we will map the direction of the magnetic field lines using a compass.  We will map the fields of a bar magnet and a solenoid, which both have a theoretical field (ideally) of a pure magnetic dipole, for fields outside (see the pre-lab). In the second part of the lab we will need to measure the magnetic field strength inside our deflecting solenoid (see next section).  To do this, we will use a gaussmeter.

Magnetic Forces:

Charges that move are the source of magnetic fields, but not only that, charges that move in magnetic fields also feel a magnetic force. The magnitude and direction of the force that is felt by the charge is given by the Lorentz Force Law:

FB = q v x B  
(underlined variable means that this is a vector quantity)

The x in this equation means cross product or vector product.  The magnitude of this force is:

|FB| = q|v||B| sin
(where |FB| means the magnitude of the vector FB, q is the charge which is moving in the magnetic field, v is the velocity of the charge, B is the magnitude of the magnetic field strength, and is the angle between v and B.)

The direction of this force is given by the right hand rule.  (Some students are confused with this right hand rule and the right hand rule which is used to determine the direction of the magnetic field.  Actually all cross products have a "right hand rule" and it is always the same rule, but the values which is in the product are the values which determine how you use the rule.)

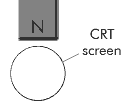
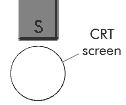
We will directly verify the right hand rule in the lab using a bar magnet as the source of the magnetic field, and we will use the cathode ray tube as the moving charges, as shown below.  What direction should the electrons be deflected in this case, according to the right hand rule?


Answer: the electrons will be deflected into the page.  When looking down at the screen (when the electron is coming out towards you) you should see the electron deflect to the left when you move the magnet close to the CRT.

We would also like to make a quantitative measurement of the deflection of the electron for magnetic deflections in the same way that we did for electric deflections.  Unlike electric deflections, a constant magnetic field causes the charge to undergo circular motion rather than a parabola. Not only that, but the circular motion is perpendicular to the magnetic field. How big the circle is depends on the velocity of the charge, the magnetic field strength, the mass of the charge, and the amount of charge, as we see below:

centripetal force = mangetic force
FC = FB

mv2/R = qvBsin
R = mv/qB
if v and B are perpendicular

Here we see that if we can measure the radius of the circular path, we can easily find the ratio q/m, the charge-to-mass ratio. However, if we deflect the electrons as we did in the example above (with the bar magnet), there are two problems which arise.  First, the bar magnet does not produce a constant magnetic field; it produces a field which varies in magnitude and direction from point to point.  Second, we can't see the electron inside the CRT.  We can only see the point where the electron hits the screen.  This means that even if the bar magnet could produce a constant field, we still couldn't measure the radius, because we wouldn't know how much of the circle that the electron had travelled.

There are ways to do this.  If you go to the second floor of Watanabe, along the hall you will see a photograph of some strange curly lines.  These are the paths of charged particles (produced in a high energy collision) going through a special apparatus called a bubble chamber.  We do have student versions of these, called cloud chambers, but this device is brittle and slightly dangerous because it requires liquid nitrogen to cool it down to the critical temperature, so we don't allow freshmen physics students to use these in general.


So what can we do? First, we need something that produces a constant magnetic field: a solenoid.  Inside a solenoid, the field is nearly constant (in the same way that the electric field was nearly constant inside the capacitor). If we place the CRT inside the solenoid, the field will be nearly constant in the CRT.  However, the field is not pointing down like it was in our original picture.  The field will point along the axis of the CRT, as shown below.


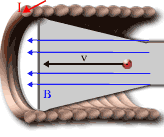
This presents another dilemma, however. The v and the B vectors are going in the same direction, so there is no magnetic force on the charge! So what do we do?  Well, remember last time we used the cathode ray tubes? We learned that the electric deflection provided by the capacitor plates gave a velocity in the y direction! So here's what we'll do: we will first use electric deflection to get a velocity in the y direction.  Then, having a velocity in the y direction, there will be a magnetic deflection in the solenoid.

We will analyze this situation in class in the same manner we did for electric deflection. At the end of the lecture, we will get the equation:


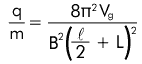
This is the charge to mass ratio of the electron.  Note that the l and L in the equation are still the values found on pg. 39. The known value for the mass of an electron is 9.11 x 10⁻³¹ kg, and the charge of the electron is 1.6 x10⁻¹⁹ C.  How does your experimental value compare?


Procedure:
This looks very long, but this lab is very quick. Each activity should take only a few minutes.

Part I: Mapping Magnetic Fields
Warning: These field maps must be done on the wooden lab benches; the metal tables interfere with the magnetic fields.

1. Place a bar magnet on a piece of white paper or graph paper.

2. Obtain a compass. Determine which side of the compass (either blue or silver) points along the magnetic field lines. While holding the compass away from any source of magnetic field, note the side that points towards the geographic North (which is the magnetic South pole). This is the correct side to use.

3. Place a compass somewhere on the paper. Usually one starts at the edge of the magnet.

4. Mark the direction which the compass is pointing.  That is the direction of the magnetic field at that point.

5. Move your compass about 1 cm in the direction the compass was pointing in step 4.  Mark the direction it is pointing now.

6. Continue steps 4 and 5 until you have mapped the field on  the upper half of your paper.  You can now connect the marks you made to make a smooth, continuous curve.
7. Repeat step 6 until you have at least four magnetic field lines.

Alternate method: You need not follow any individual field line (as in steps 4 through 7). You can place your compass at arbitrary points on the paper and make many arrows all over your paper indicating the direction of the magnetic field at those points. Then you can draw in field lines following those arrows. This method is faster but requires that you fill your entire paper with arrows. (This method is much like your pre-lab exercise).

8. Repeat steps 1 - 7 for a solenoid. Simply connect the solenoid to the power supply and let about 1 A run through the solenoid (as measured by the power supply). To make things easier, you only need to draw one side of the solenoid (I recommend placing the solenoid at the very top of your paper, and draw the bottom half of the field).

Part II: Verifying the Right Hand Rule

1.  Obtain a bar magnet.
2.  Move one side of the magnet (N or S) close to the CRT, as shown in the picture in your data sheet.
3.  Write your observations in your data section.
4.  Repeat for the other side of the magnet.

Part III: Getting the Charge to Mass Ratio

1.  Measure V_g.  You will need to exercise the same caution that you used in the previous (electric deflection) lab.  (Never connect or disconnect any wires while the power supply is on!).
 

2.  Count the number of turns (loops) in the solenoid, and measure its length.  n = # of turns / length

3.  Place the solenoid over the CRT.

4.  Plug in the large power supply into the solenoid. Before you turn it on, you should see a line.  If you do not, increase the deflection voltage. 

Be cautious!  The power supply puts out a great deal of current (>10 A!).  Do NOT use the multimeter to measure this current.  Turn the power supply on, making sure that you are not touching any of the connections.

5.  Determine the current at which the image on the CRT becomes a point.  This corresponds to the case at which the electron has gone through one period.  ***To determine the current, read the dial on the solenoid's power supply***.  As soon as you finish this step, turn off the power supply to the solenoid.

6.  The current reading on the power supply has a known systematic error.  We would like to correct this.  On each power supply, there is a little label with the slope and intercept values.  The corrected current = M*(power supply current reading) + B.

7.  Calculate q/m using B =  0nI

Part IV: Using a Gaussmeter to Determine Magnetic Field Strength

1.  Obtain a Gaussmeter.

2.  Point the probe at the chalkboard, as far away from the solenoids in the class as possible.  Change the "zero" knob until the value is zero when the Gaussmeter is pointed in this manner.


3.  Use the Gaussmeter to determine the magnetic field strength of the solenoid used in Part I of the experiment.
a)  Turn on your solenoid by running through it the same amount of current you did in part I to get the dot.
b)  Record the field strength you read on the Gaussmeter at 5 cm increments.
c)  Determine the magnetic field strength of each of these points, and make a graph of B vs length.

Data:
Part II: Verifying the Right Hand Rule

Expected deflection:

Draw the direction of the velocity of the electron, the magnetic field of the bar magnet, and the magnetic force on the electron.
Experimental Deflection:

Draw what you observed in the experiment


Part III: Getting the Charge to Mass Ratio

Number of Loops in the solenoid: ___________+/-____________
Length of the solenoid: ___________+/-____________
Accelerating voltage, Vg : ___________+/-____________
Current at which you see a dot: ___________+/-____________
M (slope of graph, given on power supply) : ___________+/-____________
B (intercept of graph, given on power supply) : ___________+/-____________
Corrected Current : ___________+/-____________
q/m : ___________+/-____________

Part IV:
Using a Gaussmeter to Determine Magnetic Field Strength

Distance from the end of the solenoid
( cm )
Magnetic Field Strength
(      )

5

10

15

20

25

30

35

40

45


Assignment:

1)  Is the approximation that B is constant in the solenoid a good one?  Where does this approximation begin to fail?


2) Determine the charge to mass ratio using the magnetic field measured with the Gaussmeter.  Find the % difference between this value and the q/m you found in part I.  Which is better?