IPv6 Tunnel using Microsoft Windows 2000
Wilson Chan
The installation procedure below is a step-by-step process to get your
Windows 2000 machine connectivity usingFreenet6 IPv6 tunnel.
Below are the 4 main steps to getting started.
1.
Install an Ipv6 stack
2.
Install the Freenet6's client and configure tspc.conf
3.
Create a user id if you want to create an Authenticated tunnel and
configure tspc.conf
4.
Test IPv6 for connectivity.
Requirements:
This IPv6 tunnel
will only work on Microsoft Windows 2000 machines. Make sure to only install
Service Pack 1. Microsoft's IPv6
stack currently does not support Service Pack 2.
Before you start
make sure that you have a valid IPv4 address. This address should not be a NAT
address. Hosts must have Internet
unicast address globally unique meaning the private addressing (10.x.x.x,
172.16.x.x, 192.168.x.x) is not accepted by tunnel server.
See the
requirements to use TSP
Step 1:
Download and configure Microsoft's
IPv6 stack.
For more info go to: Microsoft
IPv6 Technology Preview for Windows 2000
1. Log on to the Windows 2000 computer with a user account that has local administrator privileges.
2. Using Windows Explorer, run the Setup.exe program from the location where you extracted the IPv6 Technology Preview files (for example, C:\IPv6Kit).
3. From the Windows 2000 desktop, click Start, point to Settings, and then click Network and Dial-up Connections. As an alternative, you can right-click My Network Places, and then click Properties.
4. Right-click the Ethernet-based connection to which you want to add the IPv6 protocol, and then click Properties. Typically, this connection is named Local Area Connection.
5. Click Install.
6. In the Select Network Component Type dialog box, click Protocol, and then click Add.
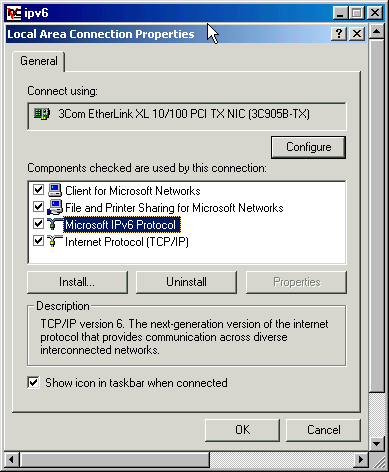
7. In the Select Network Protocol dialog box, click Microsoft IPv6 Protocol and then click OK. The IPv6 Protocol should now be displayed in the General tab. (See figure below)
8.
Click Close to close the Local Area Connection Properties
dialog box.
Step
2
1.
Download Freenet6's client binary code.
|
Operating system supported |
Anonymous tunnel |
Authenticated tunnel |
Prefix delegation |
Binary code |
Source code |
|
Windows 2000 |
Supported |
Supported |
Supported |
·
Anonymous tunnel :
Freenet6 provides one single IPv6 address to a client without authentication. If
the IPv4 address changes then the IPv6 assigned will change also.
·
Authenticated tunnel :
Freenet6 provides one single IPv6 address to a client after a successful
authentication to the server. If the IPv4 address changes then the IPv6 assigned
to the user will be the same.
·
Prefix delegation :
Freenet6 provides one single address and a /48 IPv6 prefix to a client after a
successful authentication to the server.
2.
Unzip the file (freenet6-0.7a.zip) to a directory.
3.
Go to Step 3 if you want to create an authenticated tunnel. If you want
to create an anonymous tunnel follow steps 4-8 below.
4.
Open a MS-DOS command prompt (Start->Run->cmd)
5.
CD into the directory where the files are unzipped.
6.
Type in this command: tspc
vf tspc.conf
7.
IPv6 tunnel should now be configured through an anonymous tunnel.
8.
Skip Step 3 and proceed to Step 4 to test connection.
Step
3
1.
Go to Freenet6: Account creation website
2.
Enter a user-id with a minimum of 8 characters and maximum of 63.
3.
Enter an Email address with a maximum of 63 characters.
4.
Freenet6 will email you with your password and login that is needed for creating
an Authenticated tunnel.
5.
CD into the directory where the freenet6 files are located
6.
Open tspc.conf with notepad.
7.
Locate userid=anonymous and replace anonymous with your userid
# userid=anonymous
# the userid can be anonymous or
any alphanumeric value that is dns legal.
# userid=anonymous
userid=anonymous <- Replace with
userid
8.
Locate and remove # from last passwd=
9.
Type in your passwd where it now says passwd=
# passwd=
# The passwd must be empty if userid is anonymous or
an alphanumeric string
# if userid is not anonymous.
#passwd= <-
Remove # and enter passwd after =
10.
Open a MS-DOS command prompt (Start->Run->cmd)
11.
CD into the directory where the files are unzipped.
12.
Type in this command: tspc
vf tspc.conf
13. IPv6 tunnel should now be configured through an authenticated tunnel.
Step
4
You should now have a configured tunnel.
Now try and access the Microsoft Research IPv6-only web site through your browser. If everything works find you will see Microsoft's Ipv6 web page. http://ipv6.research.microsoft.com/

ON-LINE RESOURCES:
1.
Freenet6 - IPv6 Implementations
2.
Microsoft Microsoft IPv6 Technology Preview for Windows 2000
Http://msdn.microsoft.com/downloads/sdks/platform/tpipv6.asp