
(This passage was adapted from Microbiology: A Laboratory Manual, 5th edition, Cappuccino, J.S. and Sherman, N., Benjamin/Cummings Science Publishing.)
1.To become familiar with the history and diversity of microscope instruments.
2.To understand the components, use, and care of the compound brightfield microscope.
3.To learn the correct use of the microscope for observation and measurement of microorganisms.
INTRODUCTION
Microbiology, the branch of science that has so vastly extended and expanded our knowledge of the living world, owes its existence to Antony van Leeuwenhoek. In 1673, with the aid of a crude microscope consisting of a biconcave lens enclosed in two metal plates, Leeuwenhoek introduced the world to the existence of microbial forms of life. Over the years, microscopes have evolved from the simple, single-lens instrument of Leeuwenhoek, with a magnification of 300, to the present-day electron microscopes capable of magnifications greater than 250,000. Microscopes are designated as either light microscopes or electron microscopes. The former use visible light or ultraviolet rays to illuminate specimens. They include brightfield, darkfield, phase-contrast, and fluorescent instruments. Fluorescent micro-scopes use ultraviolet radiations whose wavelengths are shorter than those of visible light and are not directly perceptible to the human eye. Electron microscopes use elec-tron beams instead of light rays, and magnets instead of lenses to observe submicro-scopic particles.
Essential Features of Various Microscopes
Brightfield Microscope
This instrument contains two lens systems for magnifying specimens: the ocular lens in the eyepiece and the objective lens located in the nose-piece. The specimen is illuminated by a beam of tungsten light focused on it by a sub-stage lens called a condenser, and the result is that the specimen appears dark against a bright background. A major limitation of this system is the absence of contrast between the specimen and the surrounding medium, which makes it difficult to observe living cells. Therefore, most brightfield observations are performed on nonviable, stained preparations.
Darkfield Microscope
This is similar to the ordinary light microscope; however, the condenser system is modified so that the specimen is not illuminated directly. The con-denser directs the light obliquely so that the light is deflected or scattered from the spec-imen, which then appears bright against a dark background. Living specimens may be observed more readily with darkfield than with brightfield microscopy.
Phase-Contrast Microscope
Observation of microorganisms in an unstained state is possible with this microscope. Its optics include special objectives and a condenser that make visible cellular components that differ only slightly in their refractive indexes. As light is transmitted through a specimen with a refractive index different from that of the surrounding medium, a portion of the light is refracted (bent) due to slight varia-tions in density and thickness of the cellular components. The special optics convert the difference between transmitted light and refracted rays, resulting in a significant vari-ation in the intensity of light and thereby producing a discernible image of the struc-ture under study. The image appears dark against a light background.
Fluorescent Microscope
This microscope is used most frequently to visualize speci-mens that are chemically tagged with a fluorescent dye. The source of illumination is an ultraviolet (UV) light obtained from a high-pressure mercury lamp or hydrogen quartz lamp. The ocular lens is fitted with a filter that permits the longer ultraviolet wavelengths to pass, while the shorter wavelengths are blocked or eliminated. Ultraviolet radiations are absorbed by the fluorescent label and the energy is re-emitted in the form of a different wavelength in the visible light range. The fluorescent dyes absorb at wavelengths between 230 and 350 nanometers (nm) and emit orange, yellow, or greenish light. This microscope is used primarily for the detection of antigen-antibody reactions. Antibodies are conjugated with a fluorescent dye that becomes excited in the presence of ultraviolet light, and the fluorescent portion of the dye becomes visible against a black background.
Electron Microscope
This instrument provides a revolutionary method of microscopy, with magnifications up to one million. This permits visualization of submicroscopic cel-lular particles as well as viral agents. In the electron microscope, the specimen is illu-minated by a beam of electrons rather than light, and the focusing is carried out by elec-tromagnets instead of a set of optics. These components are sealed in a tube in which a complete vacuum is established. Transmission electron microscopes require speci-mens that are thinly prepared, fixed, and dehydrated for the electron beam to pass freely through them. As the electrons pass through the specimen, images are formed by direct-ing the electrons onto photographic film, thus making internal cellular structures visi-ble. Scanning electron microscopes are used for visualizing surface characteristics rather than intracellular structures A narrow beam of electrons scans back and forth, producing a three-dimensional image as the electrons are reflected off the specimen's surface.
While scientists have a variety of optical instruments with which to perform routine laboratory procedures and sophisticated research, the compound brightfield micro-scope is the "workhorse" and is commonly found in all biological laboratories. Although you should be familiar with the basic principles of microscopy, you probably have not been exposed to this diverse array of complex and expensive equipment. Therefore, only the compound brightfield microscope will be discussed in depth and used to examine specimens.
USE OF THE MICROSCOPE
PURPOSES
To become familiar with the:
1.Theoretical principles of brightfield microscopy.
2.Component parts of the compound micro-scope.
3.Use and care of the compound microscope.
4.Practical use of the compound microscope for visualization of cellular morphology from stained slide preparations.
PRINCIPLE
Microbiology is a science that studies living organisms that are too small to be seen with the naked eye. Needless to say, such a study must involve the use of a good compound microscope. Although there are many types and variations, they all fundamentally consist of a two-lens system, a variable but controllable light source, and mechanical adjustable parts for determining focal length between the lenses and specimen.
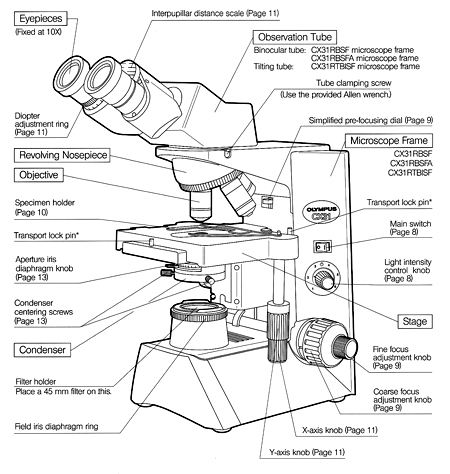
Components of the Microscope

Stage
A fixed platform with an opening in the center allows for the passage of light from an illu-minating source below to the lens system above the stage. This platform provides a surface for the placement of a slide with its specimen over the central opening. In addition to the fixed stage, most microscopes have a mechanical stage that can be moved vertically or horizontally by means of adjustment controls. Less sophisticated micro-scopes have clips on the fixed stage, and the slide must be positioned manually over the central opening.
Illumination
The light source is positioned in the base of the instrument. Some microscopes are equipped with a built-in light source to pro-vide direct illumination. Others are provided with a mirror; one side flat and the other concave.
An external light source, such as a lamp, is placed in front of the mirror to direct the light upward into the lens system. The flat side of the mirror is used for artificial light, and the concave side for sunlight.
Abbe Condenser
This component is found directly under the stage and contains two sets of lenses that collect and concentrate light passing upward from the light source into the lens sys-tems. The condenser is equipped with an iris diaphragm, a shutter controlled by a lever that is used to regulate the amount of light entering the lens system.
Body Tube
Above the stage and attached to the arm of the microscope is the body tube. This structure houses the lens system that magnifies the specimen. The upper end of the tube contains the ocular or eyepiece lens. The lower portion consists of a movable nosepiece containing the objective lenses. Rotation of the nosepiece posi-tions objectives above the stage opening. The body tube may be raised or lowered with the aid of coarse-adjustment and fine-adjustment knobs that are located above or below the stage, depending on the type and make of the instrument.
Theoretical Principles of Microscopy
To use the microscope efficiently and with minimal frustration, you should understand the basic principles of microscopy: magnification, resolution, numerical aperture, illumination, and focusing.
Magnification
Enlargement or magnification of a specimen is the function of a two-lens system; the ocular lens is found in the eyepiece, and the objective lens is situated in a revolving nose-piece. These lenses are separated by the body tube. The objective lens is nearer the specimen and magnifies it, producing the real image that is projected up into the focal plane and then magnified by the ocular lens to produce the final image.
The most commonly used microscopes are equipped with a revolving nosepiece containing four objective lenses possessing different degrees of magnification. When these are combined with the magnification of the ocular lens, the total or overall linear magnification of the specimen is obtained.
Resolving Power or Resolution
Although magnification is important, you must be aware that unlimited enlargement is not possible by merely increasing the magnifying power of the lenses or by using additional lenses, because lenses are limited by a property called resolving power. By definition, resolving power is the ability of a lens to show two adjacent objects as discrete entities. When a lens cannot discriminate, that is, when the two objects appear as one, it has lost resolu-tion. Increased magnification will not rectify the loss, and will, in fact, blur the object. The resolv-ing power of a lens is dependent on the wave-length of light used and the numerical aperture, which is a characteristic of each lens and imprinted on each objective. The numerical aper-ture is defined as a function of the diameter of the objective lens in relation to its focal length. It is doubled by use of the substage condenser; which illuminates the object with rays of light that pass through the specimen obliquely as well as directly. Thus, resolving power is expressed mathematically, as follows:
Resolving power = Wavelength of Light .
2 (Numerical Aperture)
Based on this formula, the shorter the wave-length, the greater the resolving power of the lens. Thus, short wavelengths of the electromag-netic spectrum are better suited than longer wavelengths in terms of the numerical aperture.
However; as with magnification, resolving power also has limits. You might rationalize that merely decreasing the wavelength will automati-cally increase the resolving power of a lens. Such is not the case, because the visible portion of the electromagnetic spectrum is very narrow and borders on the very short wavelengths found in the ultraviolet portion of the spectrum.
The relationship between wavelength and numerical aperture is valid only for increased resolving power when light rays are parallel. Therefore, the resolving power is dependent on another factor, the refractive index. This is the bending power of light passing through air from the glass slide to the objective lens. The refractive index of air is lower than that of glass, and as light rays pass from the glass slide into the air, they are bent or refracted so that they do not pass into the objective lens. This would cause a loss of light, which would reduce the numerical aperture and diminish the resolving power of the objective lens. Loss of refracted light can be compensated for by interposing mineral oil, which has the same refractive index as glass, between the slide and the objective lens. In this way, decreased light refraction occurs and more light rays enter directly into the objective lens, producing a vivid image with high resolution.

Illumination
Effective illumination is required for efficient magnification and resolving power. Since the intensity of daylight is an uncontrolled variable, artificial light from a tungsten lamp is the most commonly used light source in microscopy. The light is passed through the con-denser located beneath the stage. The condenser contains two lenses that are necessary to produce a maximum numerical aperture. The height of the condenser can be adjusted with the con-denser knob. Always keep the condenser close to the stage, especially when using the oil-immersion objective.
Between the light source and the condenser is the iris diaphragm, which can be opened and closed by means of a lever; thereby regulating the amount of light entering the condenser. Excessive illumination may actually obscure the specimen because of lack of contrast. The amount of light entering the microscope differs with each objec-tive lens used. A rule of thumb is that as the mag-nification of the lens increases, the distance between the objective lens and slide, called working distance, decreases, whereas the numerical aperture of the objective lens increases.
|
|
|
|
|
Use and Care of the Microscope
You will be responsible for the proper care and use of microscopes. Since microscopes are expensive, you must observe the following regu-lations and procedures.
The instruments are housed in special cabinets and must be moved by users to their laboratory benches. The correct and only acceptable way to do this is to grip the microscope arm firmly with the right hand and the base with the left hand, and lift the instrument from the cabinet shelf. Carry it close to the body and gently place it on the laboratory bench. This will prevent collision with furniture or co-workers and will protect the instrument against damage.
Once the microscope is placed on the laboratory bench, observe the following rules:
1.Remove all unnecessary materials such as books, papers, purses, and hats from the laboratory bench.2.Uncoil the microscope's electric wire and plug it into an electrical outlet.
3.Clean all lens svstems; the smallest bit of dust, oil, lint, or eyelash will decrease the efficiency ot the microscope. The ocular; scan-ning, low-power, and high-power lenses may be cleaned by wiping several times with acceptable lens tissue. Never use paper tow-eling or cloth on a lens surface. If the oil-immersion lens is gummy or tacky, a piece of lens paper moistened with methanol is used to wipe it clean. If the lens is very dirty it may be cleaned with xylol however the xylol cleansing procedure should be performed only by the instructor, and only if necessary. Consistent use of xylol may loosen the lens.
The following routine procedures must be followed to ensure correct and efficient use of the microscope while focusing.
1. Place the microscope slide with the specimen within the stage clips on the fixed stage. Move the slide to center the specimen over the opening in the stage directly over the light source.2. Rotate the scanning lens or the low power lens into position. While watching from the side to insure that the lens doesn't touch the specimen, turn the coarse focus knob to move the stage as close as it can get to the lens without touching the lens. (Always watch from the side whenever you move a specimen towards any objective lens to make sure the lens doesn't crash through the specimen and get damaged!)
3. Now, while looking through the ocular lens, turn the coarse focus knob carefully, and slowly move the stage away from the lens until the specimen comes into vague focus. Then, use the fine focus knob to bring the specimen into sharp focus.
4. If this is the first specimen of the day, you should Kohler your microscope at this point (while it is in focus). Otherwise, if your microscope has already been Kohlered you won't need to do it again
5. Routinely adjust the light source by means of the light source transformer setting, and/or the iris diaphragm, for optimum illumination for each new slide and for each change in magnification.
6. Our microscopes are parfocal, which means that when one lens is in focus, other lenses will also have the same focal length and can be rotated into position without further major adjustment. In practice, however; usually a half-turn of the fine-adjustment knob in either direction is necessary for sharp focus.
7. Once you have brought the specimen into sharp focus with a low-powered lens, preparation may be made for visualizing the spec-imen under oil immersion. Place a drop of oil on the slide directly over the area to be viewed. Rotate the nosepiece until the oil-immersion objective locks into position. Care should be taken not to allow the high-power objective to touch the drop of oil.The slide is observed from the side as the objective is rotated slowly into position. This will ensure that the objective will be properly immersed in the oil. The fine-adjustment knob is readjusted to bring the image into sharp focus.
8. During microscopic examination of microbial organisms, it is always necessary to observe several areas of the preparation. This is accomplished by scanning the slide with-out the application of additional immersion oil. This will require continuous, very fine adjustments by the slow, back-and-forth rotation of the fine adjustment knob only.
On completion of the laboratory exercise, return the microscope to its cabinet in its original condition. The following steps are recommended:
1.Clean all lenses with dry, clean lens paper. If you need to, you can use a drop or two of methanol to help clean the lens. Use xylol to remove oil from the stage only.2. Place the low-power objective in position and bring the stage and objectives close together.
3.Center the mechanical stage.
4.Coil the electric wire around the body tube and the stage.
5.Carry the microscope to its position in its cabinet in the manner previously described.


